

How to track lashing usage in the 2D Bay View
Use this guide to see how many lashing rods each container above deck needs in the 2D Bay View. You set simple rules (which tiers and which rows get rods), the application marks the containers, and you can print a report. For the cones (twistlocks), see How to track cones and lashing in the 2D Bay View.
The result is an estimate from your own parameters. The application does not check weights or stress. Use it as a manual tracking tool for reporting only. It does not replace the lashing plan of the ship.
Before you start: open your file in the 2D Bay View. See How to navigate the 2D Bay View. You need a membership that includes this feature, and Admin or Edit permission for the facility. Guest users and accounts that have expired cannot use it. The mode Lashing Usage is in the Mode list only for accounts that can use it. If you do not see the mode, ask your Facility Administrator or contact Support.
- In the Mode list at the top, choose Lashing Usage. If the application has no parameters for this file yet, the window with the lashing parameters opens by itself. If it has them, click Change Calculation Parameters in the Lashing Usage bar to open the window.
- Set the parameters (2 in the picture). Use the Example Bay: list on the right to see the effect in a small picture. The table below explains each parameter.
| Parameter | Choices | At first | What it does |
|---|---|---|---|
| Port of Load | - ALL - or one port from the file | - ALL - | The calculation uses only the containers with this port of load. The other containers stay N/A. |
| Port of Discharge | - ALL - or one port from the file | - ALL - | The calculation uses only the containers with this port of discharge. With both ports chosen, a container must match both. |
| Lashing starting base | Tier 1, Tier 2 and so on | Tier 1 | The first tier that gets rods. Tier 1 is the lowest tier above deck that has a container in this bay. |
| Total number of lashing tiers | Tier 1, Tier 2 and so on | Tier 2 | The last tier that gets the normal number of rods. It is a tier number, not a count. The tiers are counted from the same Tier 1. With base Tier 2 and total Tier 3, the tiers 2 and 3 get rods. |
| Number of rods per container | 0, 1, 2, 3 or 4 | 2 | The number of rods for the tiers from the starting base to the last tier. |
| End container additional tiers | A blank, or 1, 2 and so on | 1 | How many tiers above the last tier also get rods. This is only for the outermost stack on each side of the bay. |
| Number of rods per end container | 0, 1, 2, 3 or 4 | 3 | The number of rods for these additional tiers. |
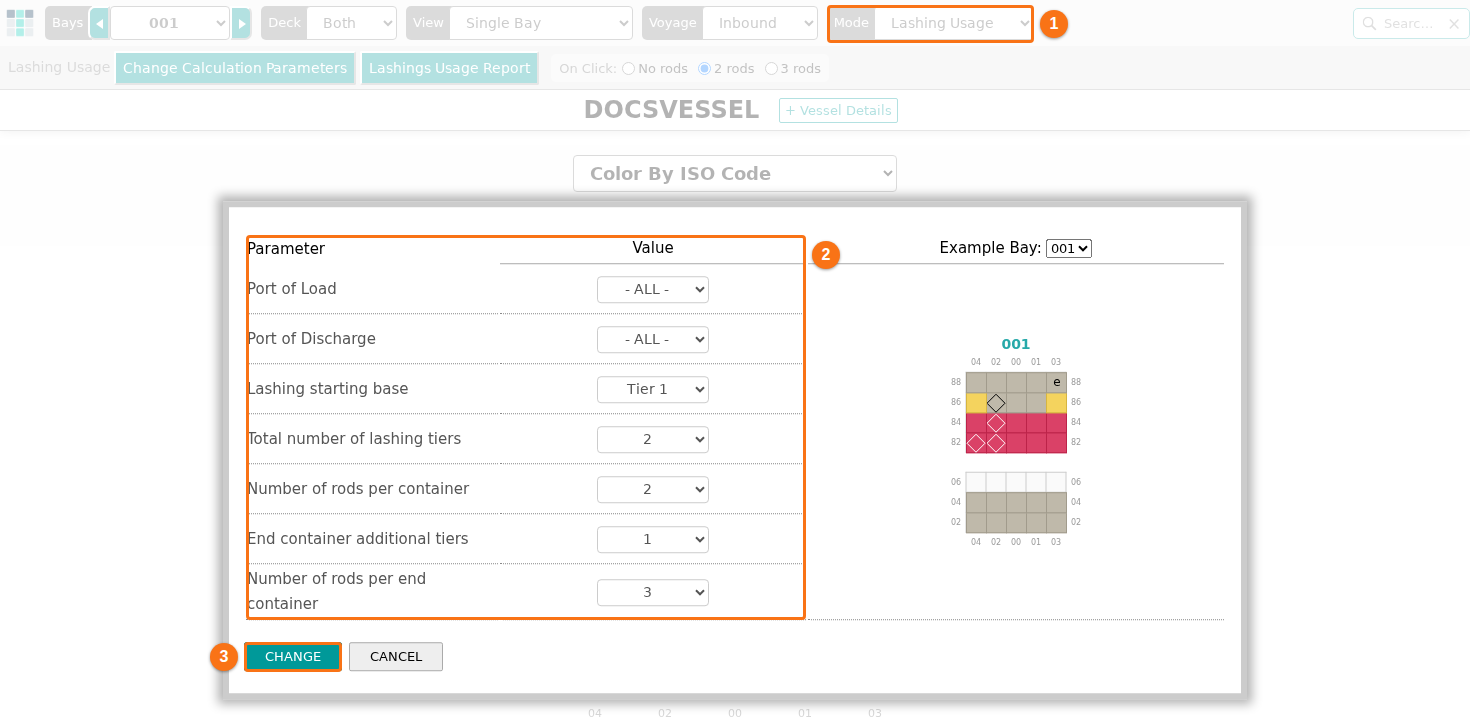
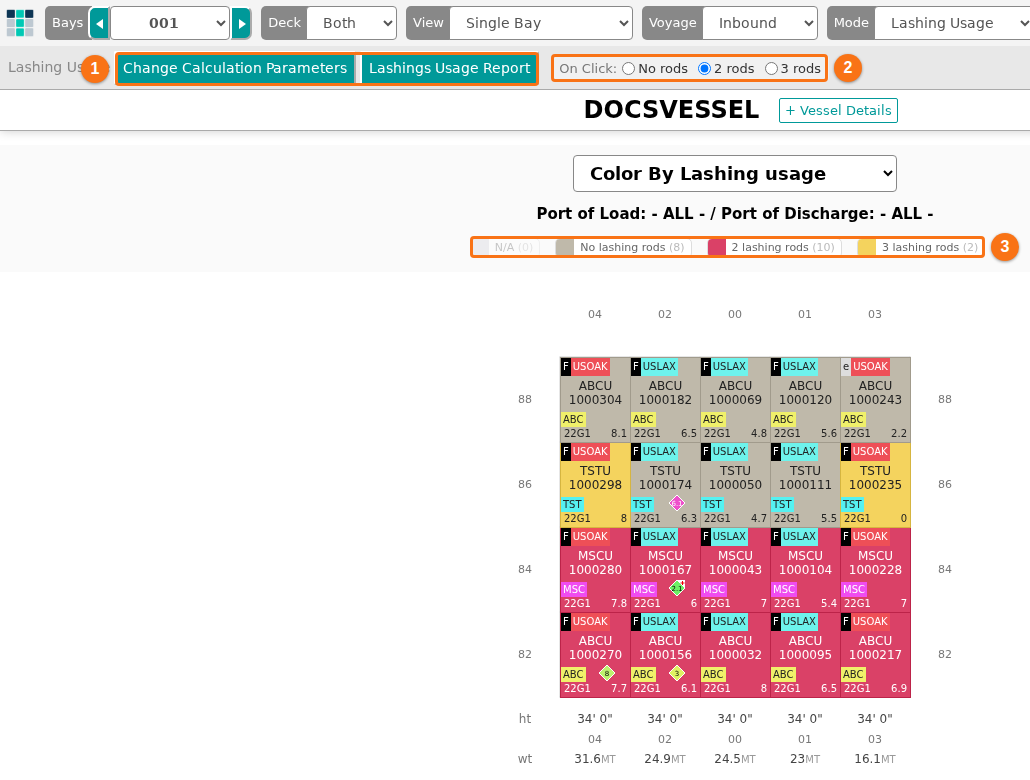
- Click CHANGE (3 in the picture above). To close the window without a calculation, click CANCEL. The Colour by list in the Color & Filter panel shows Lashing usage. The containers in the bay get a color for their number of rods. The list under Colour by shows N/A, No lashing rods, 2 lashing rods and 3 lashing rods, with the number of containers for each. It also shows 1 lashing rod and 4 lashing rods when a container has them.
Note: the value of Total number of lashing tiers must be the same as or higher than the value of Lashing starting base. If it is not, both lists get a red outline and CHANGE does nothing.
-
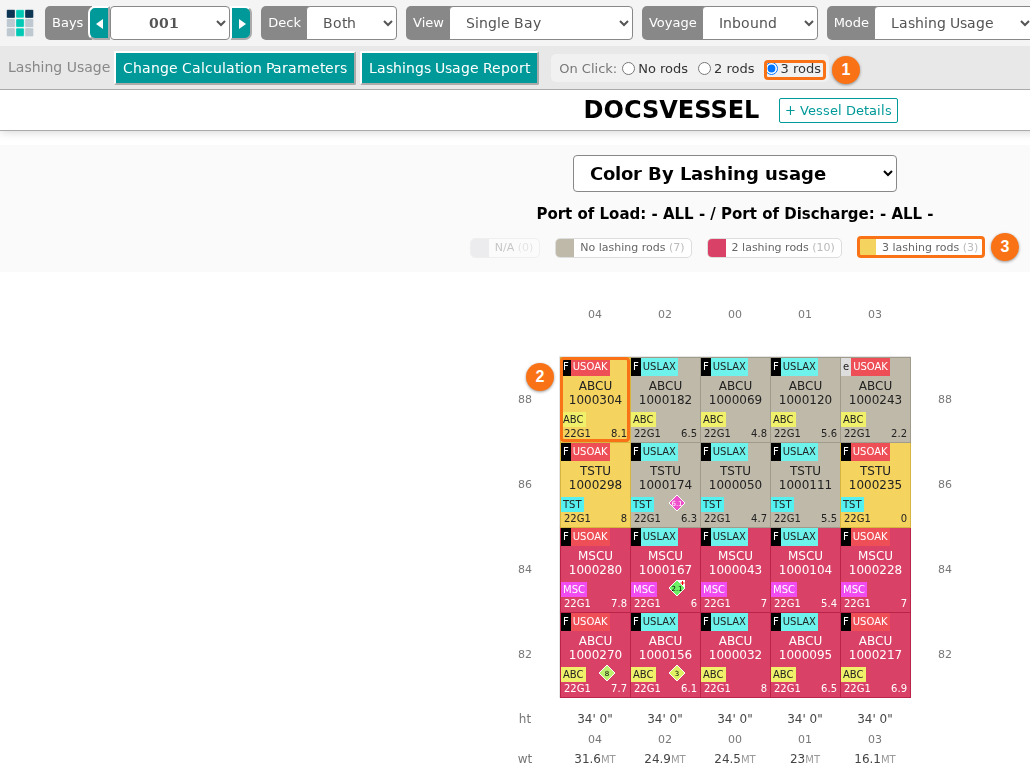
To change containers by hand, choose a value in On Click (the radio buttons in the Lashing Usage bar): No rods, 2 rods or 3 rods. At first, 2 rods is chosen. Then do one of these:
- Click one container.
- Press the mouse button and drag a rectangle over several containers. Every container inside the rectangle gets the On Click value.
The container gets this value, and the numbers in the list change. The status bar at the bottom says Please select containers to add or remove lashings.
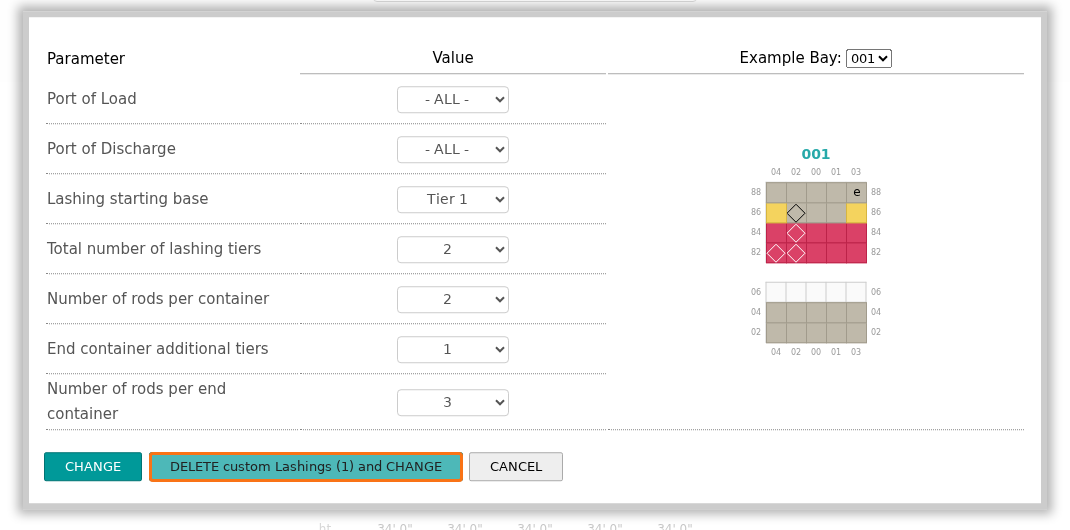
- To change the parameters later, click Change Calculation Parameters. If you set containers by hand, the window also has the button DELETE custom Lashings with the number of these containers, for example DELETE custom Lashings (1) and CHANGE (the orange frame in the picture).
- CHANGE uses the new parameters and keeps the values that you set by hand.
- DELETE custom Lashings (1) and CHANGE deletes your own values first. Then it uses the new parameters for all containers.
- To print the result, click Lashings Usage Report in the Lashing Usage bar. The Lashings Usage Report window opens. Choose the options (see the table below) and click GENERATE PDF (1 in the picture). When the PDF is ready, click Download PDF.
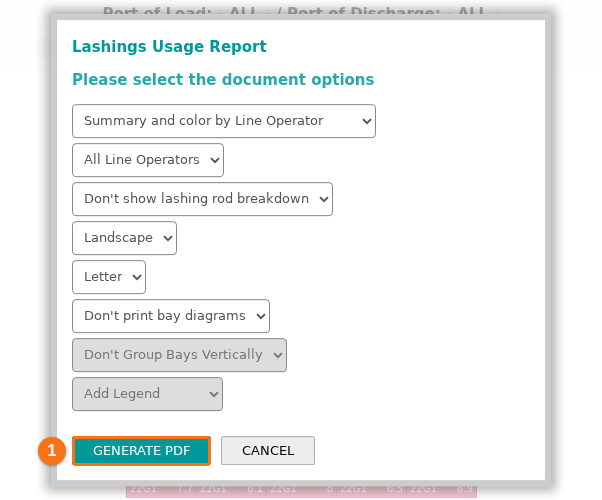
| Option | Choices | At first |
|---|---|---|
| Summary and color by | A value of your choice, for example Line Operator | Line Operator |
| Line operators | All Line Operators, or only one line operator | All Line Operators |
| Rod breakdown | Show lashing rod breakdown or Don’t show lashing rod breakdown | Don’t show lashing rod breakdown |
| Orientation | Landscape or Portrait | Landscape |
| Paper size | Letter, Legal, A4 or A3 | Letter |
| Logo | Add Logo or Don’t add Logo. Only if your facility has a logo. | Add Logo |
| Bay diagrams | Don’t print bay diagrams, or the number of bays in each row (Bays per row, 1 to 8) | Don’t print bay diagrams |
| Group bays | Don’t Group Bays Vertically or Group Bays Vertically | Don’t Group Bays Vertically |
| Legend | Add Legend or Don’t Add Legend | Add Legend |
The lists for grouping bays and for the legend are grey until you choose a number of bays in each row.
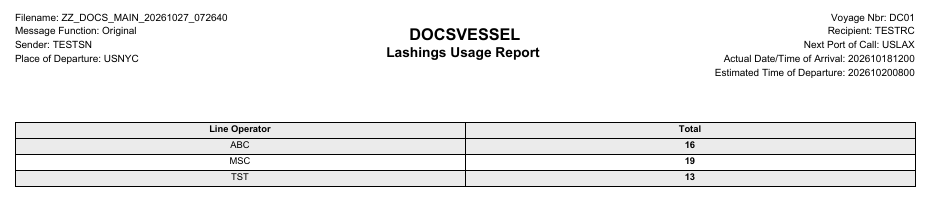
The first page of the PDF has the vessel name, Lashings Usage Report and a table. If you chose only one line operator, the title also says which one. The table has one row for each value of Summary and color by and a Total column. With the rod breakdown, the table also has a column for each number of rods (1, 2, 3 and 4). The total is the number of containers with one or more rods. It is not the number of rods. Containers with No lashing rods and N/A are not counted.
How the application finds the rods for each container
Section titled “How the application finds the rods for each container”The application checks the containers bay by bay. A 40-foot container belongs to the odd bay in front of its even bay. Only containers above deck (tier 68 and higher) get a result. Containers below deck stay N/A.
In each bay, Tier 1 is the lowest tier above deck that has a container. Tier 2 is the next tier above it, and so on. Call the starting base B, the last tier T and the additional tiers E. For each container the application follows these rules in this order:
- Ports. If you chose a port of load or a port of discharge and the container does not match, the container is left out and shows N/A.
- Your own value. If you set the container by hand, your value is used.
- Normal tiers. A container on a tier from B to T gets Number of rods per container.
- End containers. A container above tier T, up to E more tiers, gets Number of rods per end container. This is only for the outermost stacks. The outermost stack on the starboard side is the highest odd row that has a container in this bay. The outermost stack on the port side is the highest even row that has a container in this bay. The application looks at the 20-foot containers of the bay and at the 40-foot containers that belong to the bay. It is not the widest row of the vessel.
- All other containers above deck get No lashing rods. This includes the tiers below B.
Example with the first values: the starting base is Tier 1, the last tier is Tier 2, there are 2 rods per container, 1 additional tier and 3 rods per end container. Tiers 1 and 2 get 2 rods. Tier 3 gets 3 rods, but only in the two outermost stacks. All other containers on tier 3 and higher get no rods.
Good to know
Section titled “Good to know”- The numbers come from the parameters you set. They are not a stress calculation.
- The application saves your parameters and your own values for this file. They are not written into the BAPLIE file.
- Nothing is calculated until you click CHANGE. If you click CANCEL in the first window, the containers show N/A. Click Change Calculation Parameters, then CHANGE.
- When you set a container by hand, nothing happens, and no message shows, if the container is below deck, or if its port of load or port of discharge does not match the ports in the parameters.
- If you change Voyage to Outbound, the application swaps the ports. The old port of discharge becomes the port of load, and the port of discharge becomes - ALL -. If you change back, the application swaps them back. The two voyages keep separate results.
- You can select containers in the Single Bay and Mini Bays views. In the Side and Deck views you cannot select containers. A message tells you to switch to Single Bay or Mini Bays.
- The mode Lashing Usage pauses the automatic refresh of the page.