

How to use the Correct Positions Feature
Use this guide to correct container positions in 2D Bay View. You can correct containers that have an invalid position (a data anomaly), and you can correct other containers too. Correct Position only changes the stored position of a container. It does not record a move. If a container really moved to another slot during the port call, use Re-Stow. See How to use the Move Containers feature in 2D Bay View.
Correct Position is not the same as the mode Correct Restows. Correct Restows merges a list of restows into a pre-plan BAPLIE. See How to use Correct Restows to merge a restow list into a pre-plan BAPLIE.
If you upload a BAPLIE to baplieviewer.com with containers in invalid positions, the tool tells you that these are Data Anomalies. For more information about anomalies and how to open the list, please check out this documentation article.
A position is invalid in one of these cases:
- Bad Position: the vessel position is not exactly 7 numeric digits.
- Unknown Bay: the vessel position is 0999999 or 9999999.
- Missing Position: the vessel position is blank.
- Bad Row position: the vessel row position is greater than 29.
You can correct these positions in three places:
- In main content: Edit records.
- In the anomalies list.
- In 2D Bay View, in Move mode. This is the way that this guide describes.
Before you start: open your file in 2D Bay View. Move mode needs the Vessel Operations add-on for your facility. You also need Admin or Edit permission, and your account must not be expired. View-only users and guest users cannot use Move. In the header, the button Invalid Positions shows when the file has invalid positions. If you cannot use Move, it tells you to use the Main Content to fix them.
Steps to correct invalid positions
Section titled “Steps to correct invalid positions”- Open 2D Bay View. In the Mode list, choose Move.
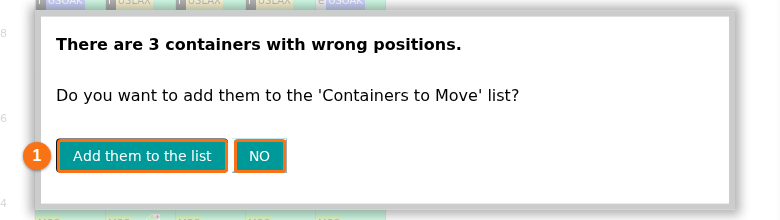
- A window says “There are 3 containers with wrong positions.” (the number is the number of invalid containers in your file). It asks “Do you want to add them to the ‘Containers to Move’ list?”. Click Add them to the list (1 in the picture) to correct them. Click NO (boxed in the picture) to ignore them. The window opens each time that you enter Move mode while there are invalid containers that are not yet in the list.
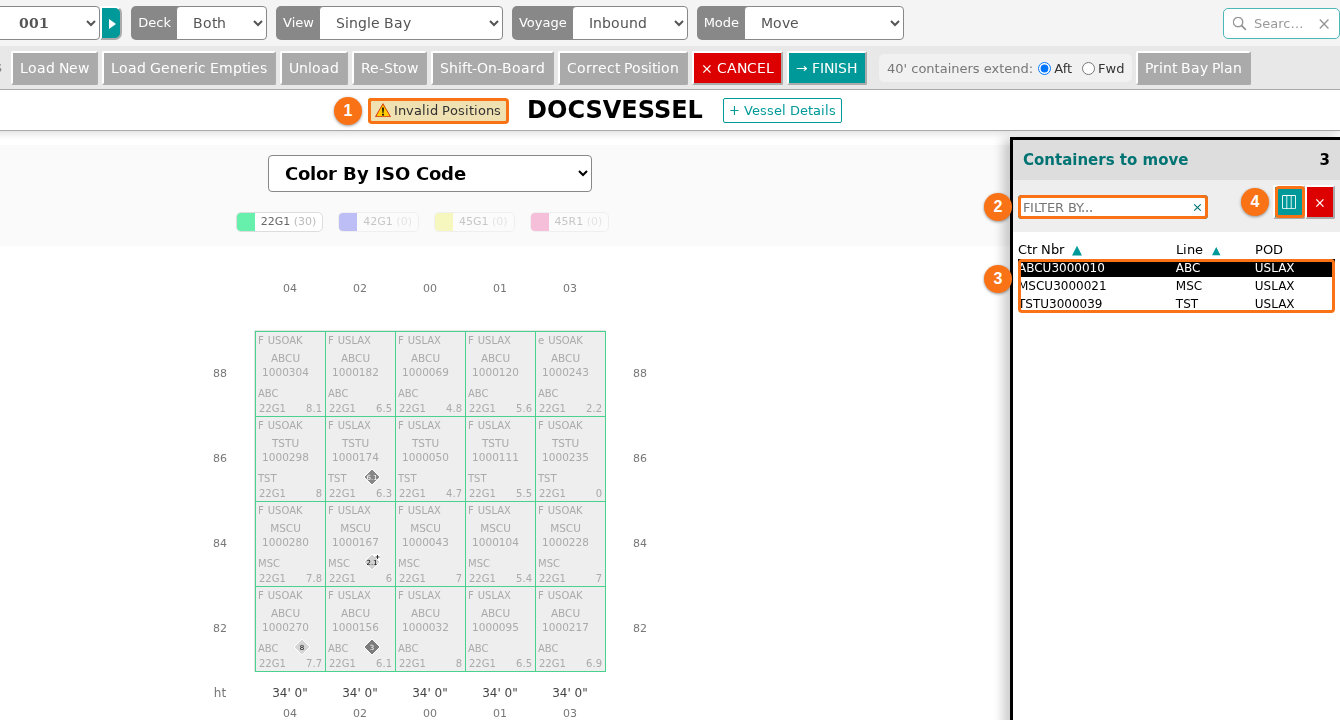
- Look at the list Containers to move on the right side of the screen. It shows all the containers to correct. To find one container, type its ID in the FILTER BY… box. The Invalid Positions button shows next to the vessel name while there are containers to correct.
- To change the fields that the list shows, click the turquoise icon above the list. The Select fields window opens. You can choose up to four fields. The container ID is always on.
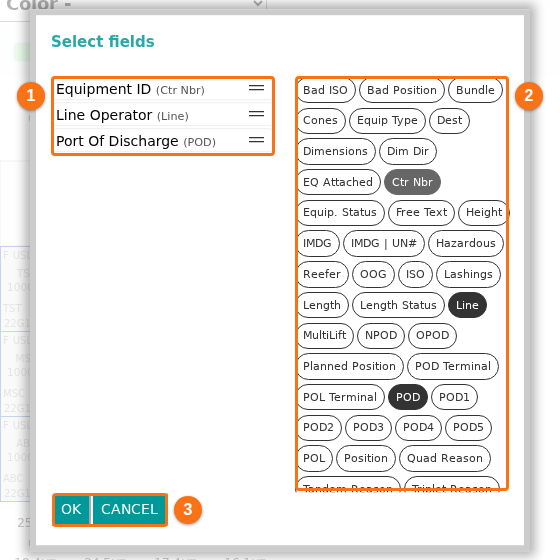
In the Select fields window, the left side (1 in the picture) shows the fields that the list uses now. To change their order, drag a field with the handle at its right (the two lines). The right side (2 in the picture) shows all fields. The dark fields are the ones in use. Click OK (3 in the picture) to use your choice. Click CANCEL to close the window without a change.
- In the bar Container Actions, click Correct Position. The button is grey until there is at least one container in the list. The containers disappear from their old slots. The buttons × CANCEL and → FINISH show in the bar, and so does 40’ containers extend.
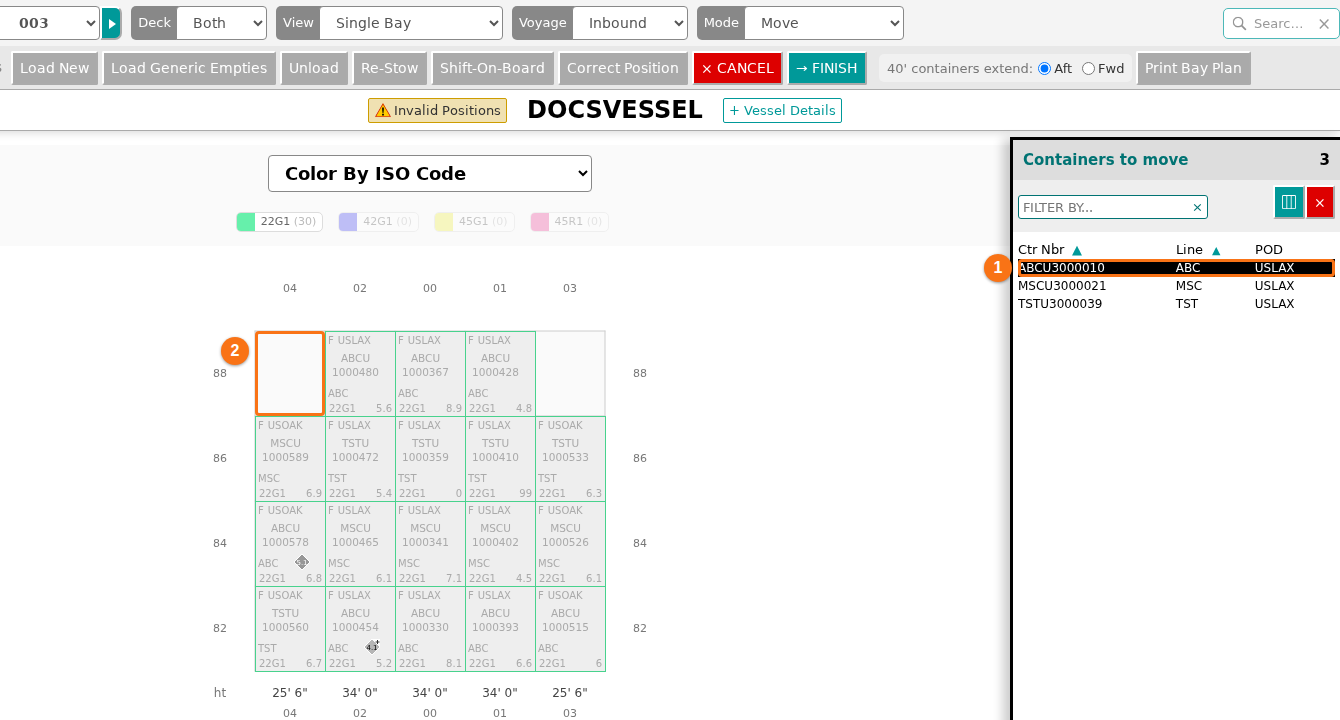
- Put the containers in the bay. If you want to place one container first, click it in the list (1 in the picture). Then click an empty slot in a bay (2 in the picture). If you do not click a row in the list, the application places the containers one after the other, in the order of the list. You can drag a rectangle over many empty slots to place many containers. For more details, see “Put the containers in the bay” in How to use the Move Containers feature in 2D Bay View. You can place a container in any bay. Use the top menu to go to other bays or to choose another view. A hint at the bottom of the screen reminds you of these two clicks.
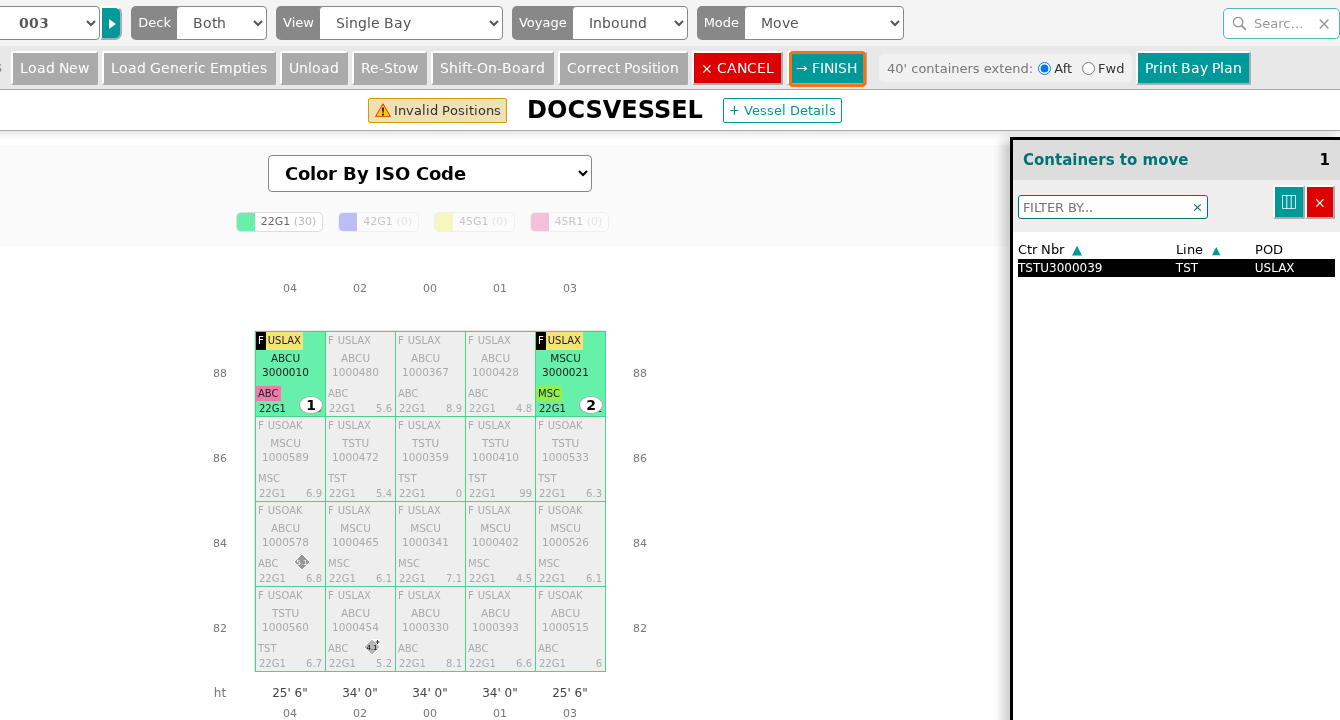
- The placed container uses the color of the attribute that you chose in Colour by. In the picture the attribute is ISO Code. Containers that were already in the bay turn grey.
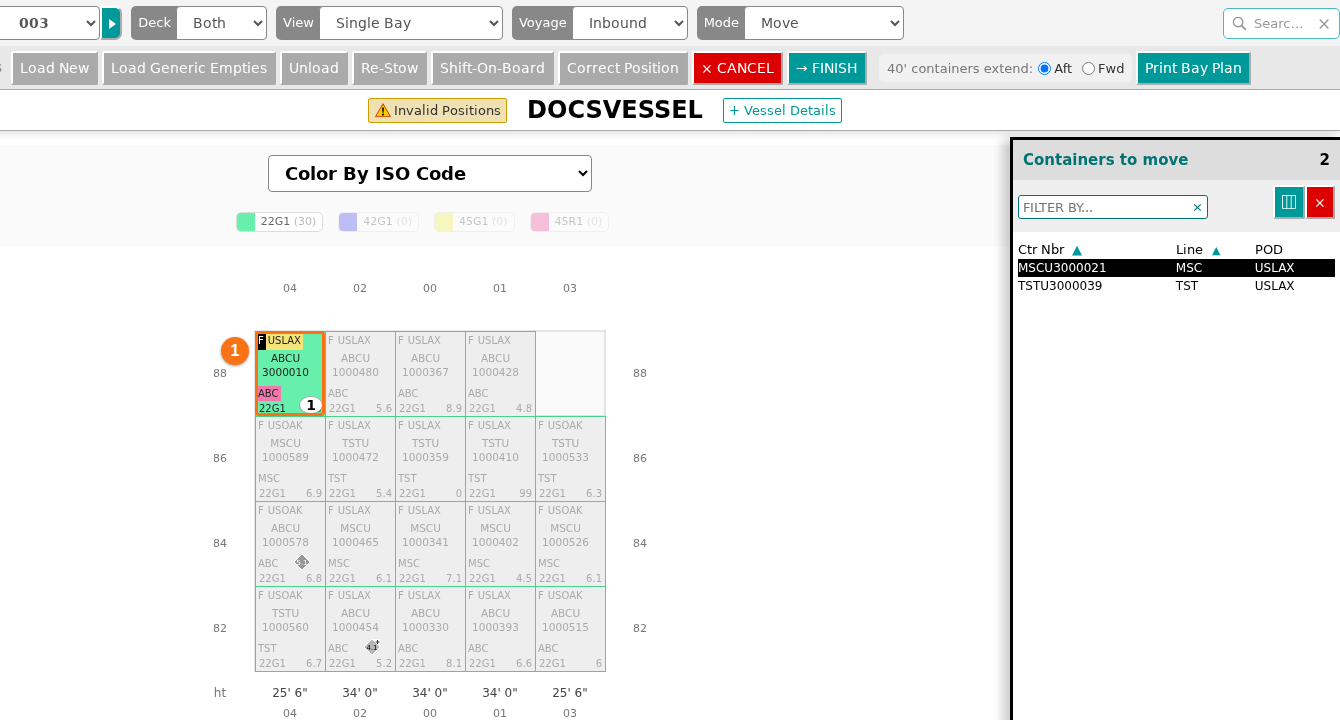
- Place the containers you want to correct. You do not have to place all of them. A 40 ft container goes in the odd bay that you click and in the even bay next to it. 40’ containers extend says which one: Aft (the bay number plus 1) or Fwd (the bay number minus 1). When you are ready, click → FINISH in the bar Container Actions (boxed in the picture). If you place the last container, the next window opens by itself.
- A window asks you to confirm the positions. Its title is Correct Positions. It says “Are you sure you want to update the current positions?”. Choose one button:
- CANCEL – discard all changes.
- REVIEW BEFORE COMMIT – close the window and check the changes one more time. When you are ready, click → FINISH.
- CONTINUE – save the changes you made.
- After you click CONTINUE, Move mode shows its usual buttons again. The corrected containers show in their new slots. The containers that you did not place stay where they were. The Invalid Positions button is gone from the header when no invalid container is left. When you open Move mode again, the window about wrong positions does not show.

Steps to correct other containers
Section titled “Steps to correct other containers”You can also correct containers that are not on the invalid containers list.
- Open 2D Bay View. In the Mode list, choose Move.
- If you do not want to correct the invalid containers now, click NO.
- Choose Single Bay or Mini Bays in the view control. You cannot select containers in the Side and Deck views.
- Choose the containers to correct. Use one of these ways:
- One container: click the container. It is added to the list on the right.
- Many containers: press the mouse button and drag a rectangle over the containers. The window Add selection to list: opens. Choose the order (Order by Tier or Order by Stack, and the direction). Click →Sequence and add. The containers show in the list on the right.
- By attribute: in the Color & Filter panel, open the Colour by list and choose an attribute, for example Is Live Reefer. Then click a value in the list under it (its heading is Select), for example Yes. A window says how many containers match, for example “N containers match the filter and will be added to the selection (S already selected).” Click YES. In Single Bay view, only the containers of the current bay are added. In other views, the containers of all bays are added.
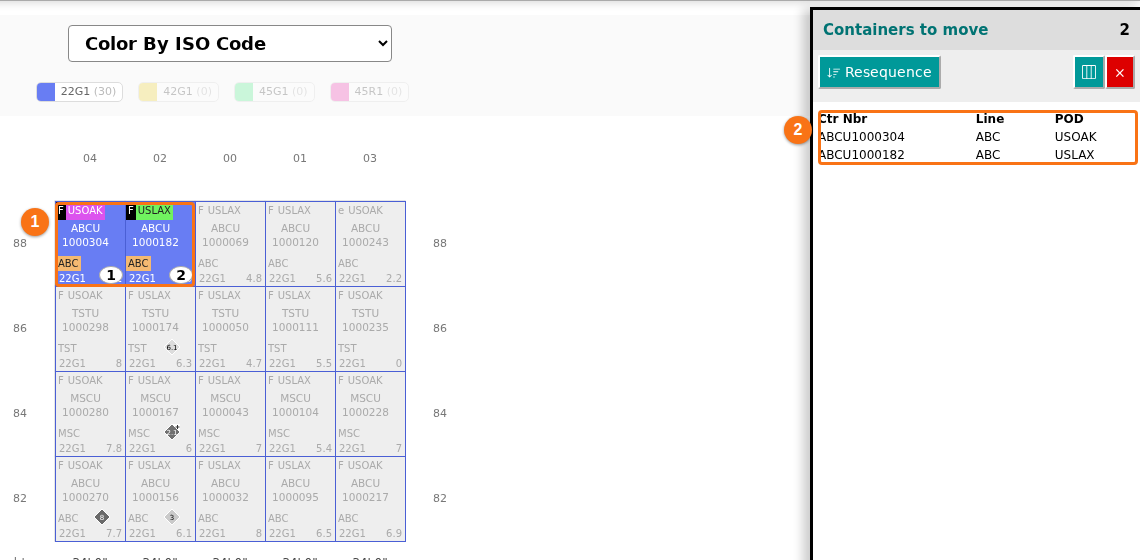
Each container that you select gets a number in the bay (1 in the picture). It shows in the list on the right (2 in the picture). All other containers turn grey.
- Click Correct Position in the bar Container Actions. Put the containers in new positions and click → FINISH, as in steps 6 to 10 above.
Good to know
Section titled “Good to know”- Nothing is saved until you click CONTINUE in the last window.
- While the action is open, you cannot change the Mode or the language. A window says “Please finish or cancel the current process before changing Mode.” Click × CANCEL or finish the action first.
- The list is not saved. If you reload the page before you click CONTINUE, the list is empty.