
How to navigate the 3D Vessel View
Use the 3D Vessel View when you want to see a realistic model of the vessel while you view an uploaded BAPLIE file. You can zoom in and look at the model bay by bay. This guide describes the screen and its modes.
Before you start: upload a file to baplieviewer.com and open it.
Open the 3D Vessel View
Section titled “Open the 3D Vessel View”- In the Function Menu on the left, open Visualization and click 3D Vessel View. The 3D data opens in a new window.
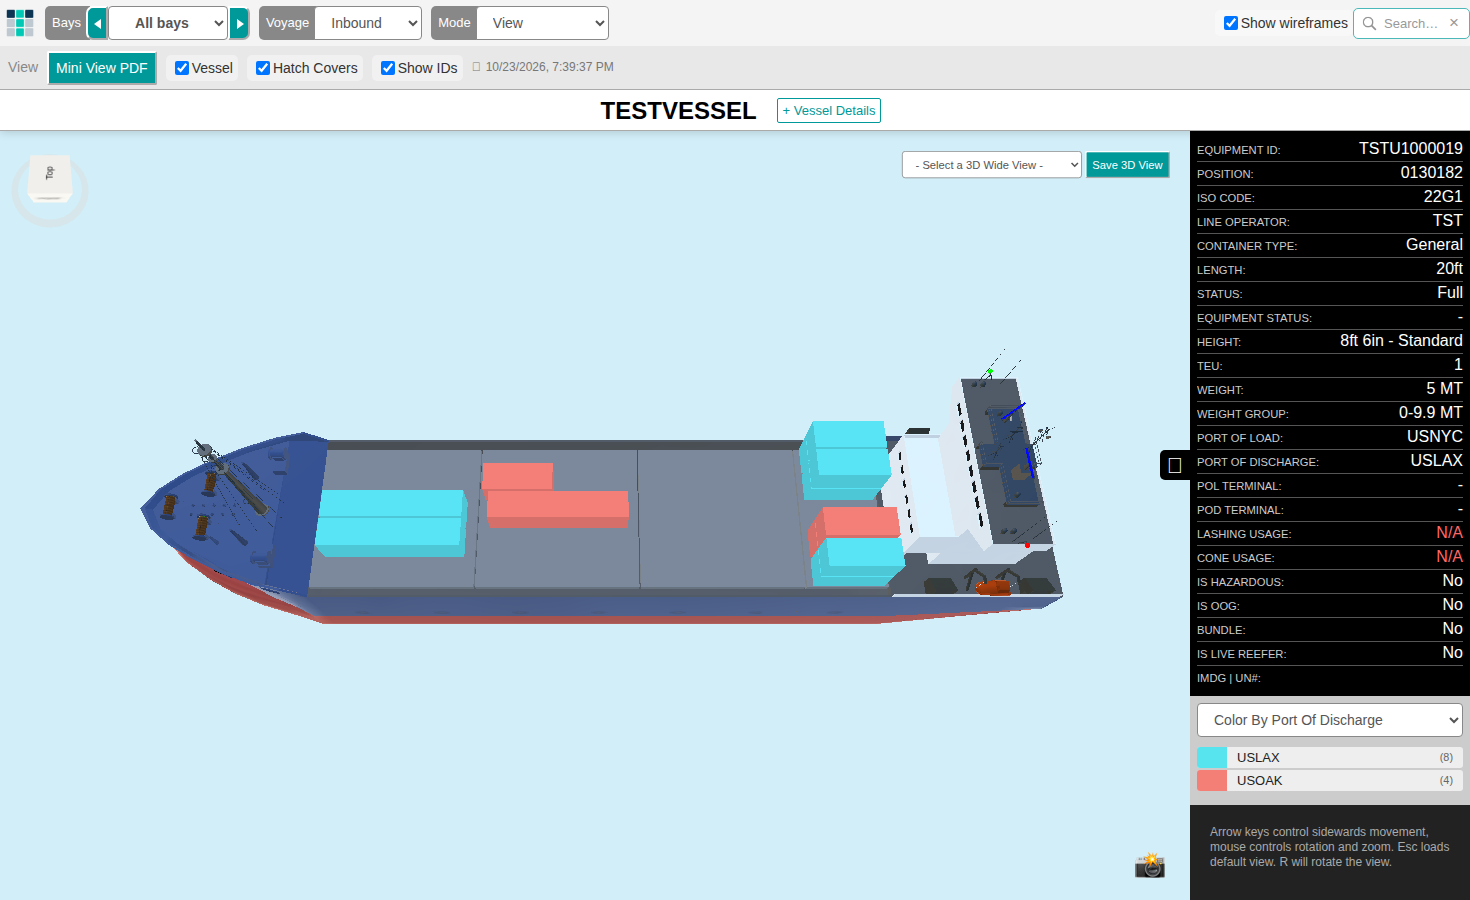
The 3D Vessel View reads the BAPLIE file to find the maximum number of bays and the widest column. It uses this to draw the vessel. So the view scales for the smallest ship and for the largest ship.
2D and 3D are one app
Section titled “2D and 3D are one app”The 3D Vessel View and the 2D Bay View are now one page. You do not need a second window for 3D. You change the view with the view control in the top bar. It has the choices Single Bay, Mini Bays, Side, Deck and 3D. The bay you chose, the color field and the filters stay when you change the view.
To switch to the 3D view:
- Check that Mode in the top bar is View. The 3D view works only in View mode. In every other mode, 3D is grey.
- Click 3D in the view control. The model loads the first time.
3D shows only if you can use Edit mode: you need Admin or Edit permission on a membership that includes Edit mode. Guest accounts and expired accounts do not see 3D. The menu entry 3D Vessel View opens the page in the 3D view. If you cannot see 3D, the page opens in your last 2D view. If you choose another mode while you are in 3D, the page goes back to the 2D view you used before. For the 2D views, see How to navigate the 2D Bay View.
In the 3D view, the bar View has these controls after Print PDFs, Customize and Dimensions:
| Control | What it does | Start value |
|---|---|---|
| Skin | Shows plain colored boxes or realistic containers. See How to use the Skin dropdown in the 3D view. | Colored |
| Ship and Bay | Ship shows the whole vessel. Bay shows the bay that you chose in the Bays list. If you choose a bay in the Bays list while you are in 3D, the view changes to Bay by itself. | Ship |
| Vessel | Shows or hides the vessel. | Ticked |
| See below | Makes the hull see-through, so you can see the containers below deck. Clear it and the hull is solid again. | Ticked |
| Hatch Covers | Shows or hides the hatch covers. | Ticked |
| Show IDs | Shows plates with the container ID on the front of each container. The plates show in Bay only. | Ticked |
| Hidden as wireframes | Shows the containers that do not match your filter or search as outlines. If it is not ticked, they are hidden. | Ticked |
| Background and Wireframes | The color of the background and the color of the outlines. | Light grey and white |
The application saves the check boxes and the two colors. It does not save Skin and Ship or Bay.
The old modes Settings, Filter and Realistic View are not in the Mode list any more. Use Customize and then Customize Colors for the container colors, the panel Color & Filter to filter and search (see How to use Color by, filters and the information panels), and the list Skin for realistic containers.
The menu bar and the controls
Section titled “The menu bar and the controls”The menu bar at the top has these items:
- Bays: choose the bay. The default is All bays, so the whole vessel is shown.
- Voyage: a drop-down. It is set to Inbound in the picture.
- Mode: choose what you want to do with the view. The default mode is View.
- Show wireframes and the search box in the top right corner.
In the 3D Vessel View you can rotate the vessel, color it by an attribute, filter it by an attribute and look at single bays. Use these controls:
- The arrow keys move the view sideways.
- The mouse rotates and zooms the vessel.
- Press Esc to go back to the default view.
- Press R to rotate the view.
Below you find each mode. Click a title to read more about a feature.
View mode
Section titled “View mode”Container details
Section titled “Container details”The panel on the right side of the screen shows the important details of the selected container (1 in the picture). Use the arrow in the middle of the panel to show or hide it.
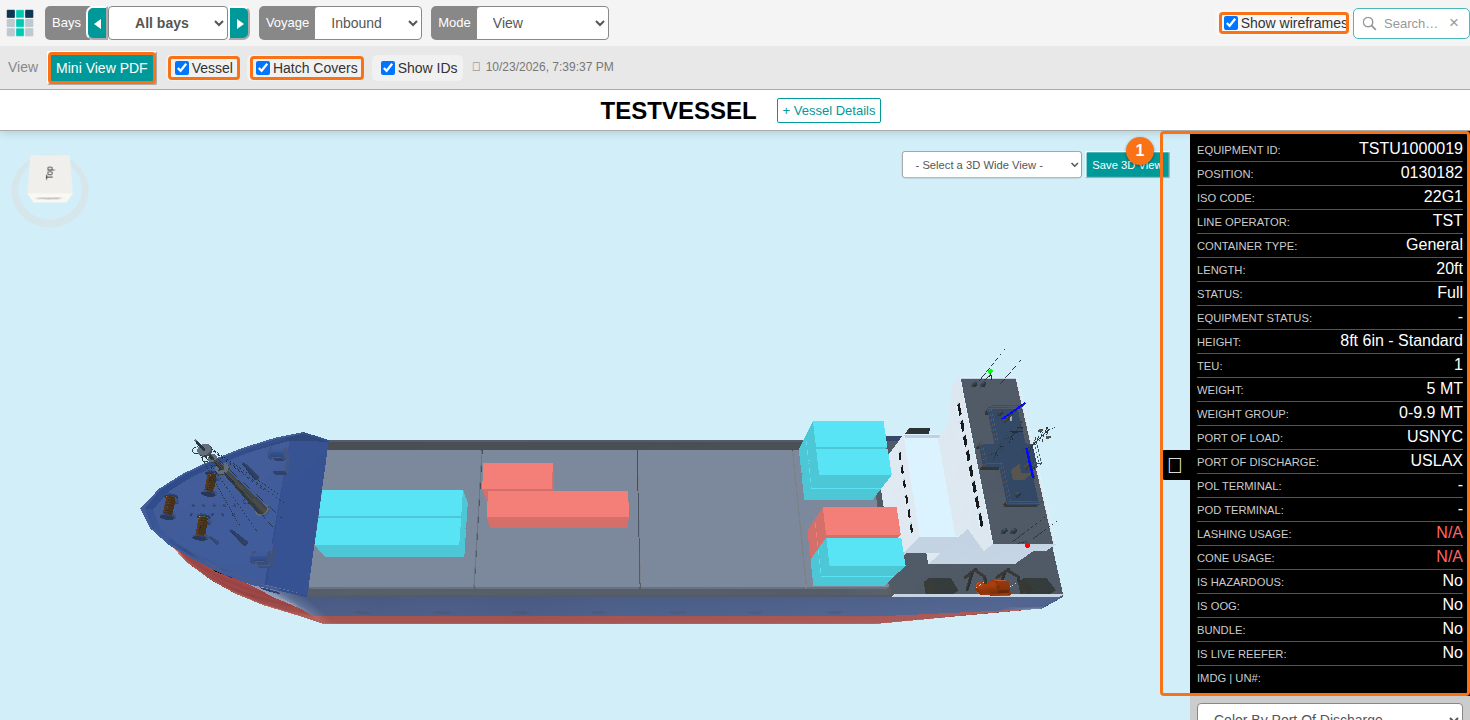
When you have finished all changes to the BAPLIE data, you can print a bay plan of the whole vessel. Click the Mini View PDF button under the top menu bar. Choose your document options. Then click Generate PDF to download the PDF and print it.
Use these options in View mode to change the 3D model:
- Vessel (checkbox under the top menu bar): shows or hides the vessel skin.
- Hatch Covers (checkbox under the top menu bar): shows or hides the hatch covers.
- Show wireframes (checkbox in the top right corner): shows or hides the wireframes when you search for a specific container.
The row also has a Show IDs checkbox.
Use Bay details to look at single bays in the 3D model.
- At the top of the screen, the default setting is All bays. Use the drop-down to choose one bay, or use the arrows to go from bay to bay.
- After you zoom in to a bay, choices also appear at the bottom of the screen. Use them to go quickly to another bay.
- In the 3D bay view, click the See container data button on the left side of the screen. A window with the 2D Bay View opens. Use it to see the details of one container.
Settings mode
Section titled “Settings mode”Change Mode to Settings to set up the 3D model the way you like.
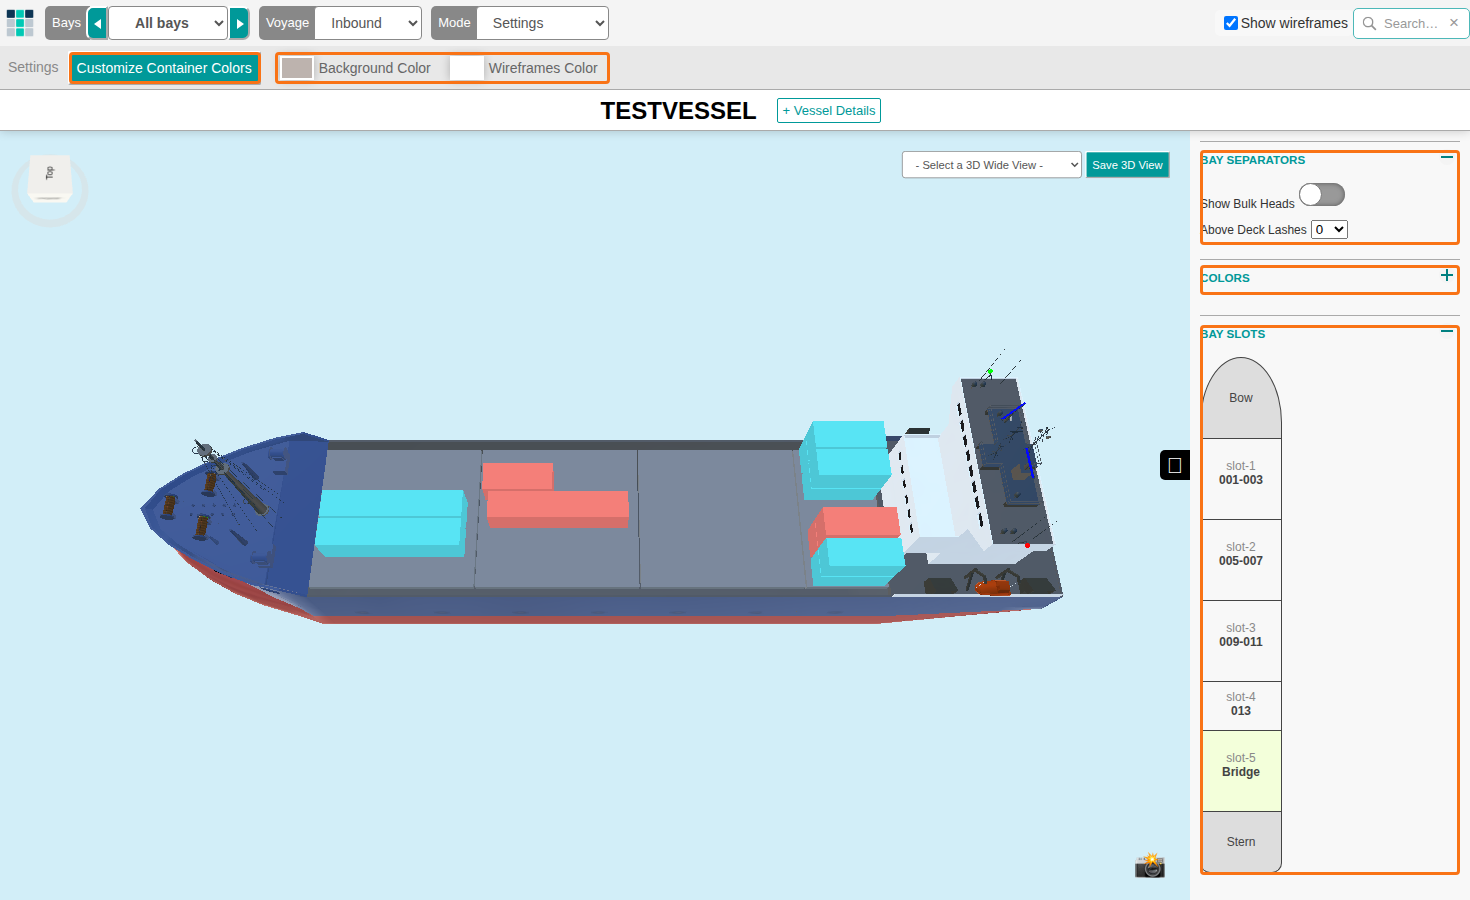
- Click Customize Container Colors to change all colors used for the containers.
- Use Background Color and Wireframes Color, just under the top menu bar, to change the background color of the screen and the color of the wireframes.
- Use the menu on the right side of the screen to change the color of the vessel skin and of other elements. Click an item. The options for it appear below it.
You can set the position and form of the vessel bridge, the smoke stacks and the deck cranes. You can also add deck lashes. Use the menu on the right side of the screen:
- Bay Separators: show or hide the bulk heads. Add deck lashes to the view.
- Bay Slots: add or move bridges, smoke stacks and deck cranes. You can also remove a deck lash or a bulk head for that bay slot only.
Filter mode
Section titled “Filter mode”Change Mode to Filter to find a container or a group of containers with filter values. The screen then shows Use Saved Filters and Manage filters under the menu bar. The filter panel is on the right.
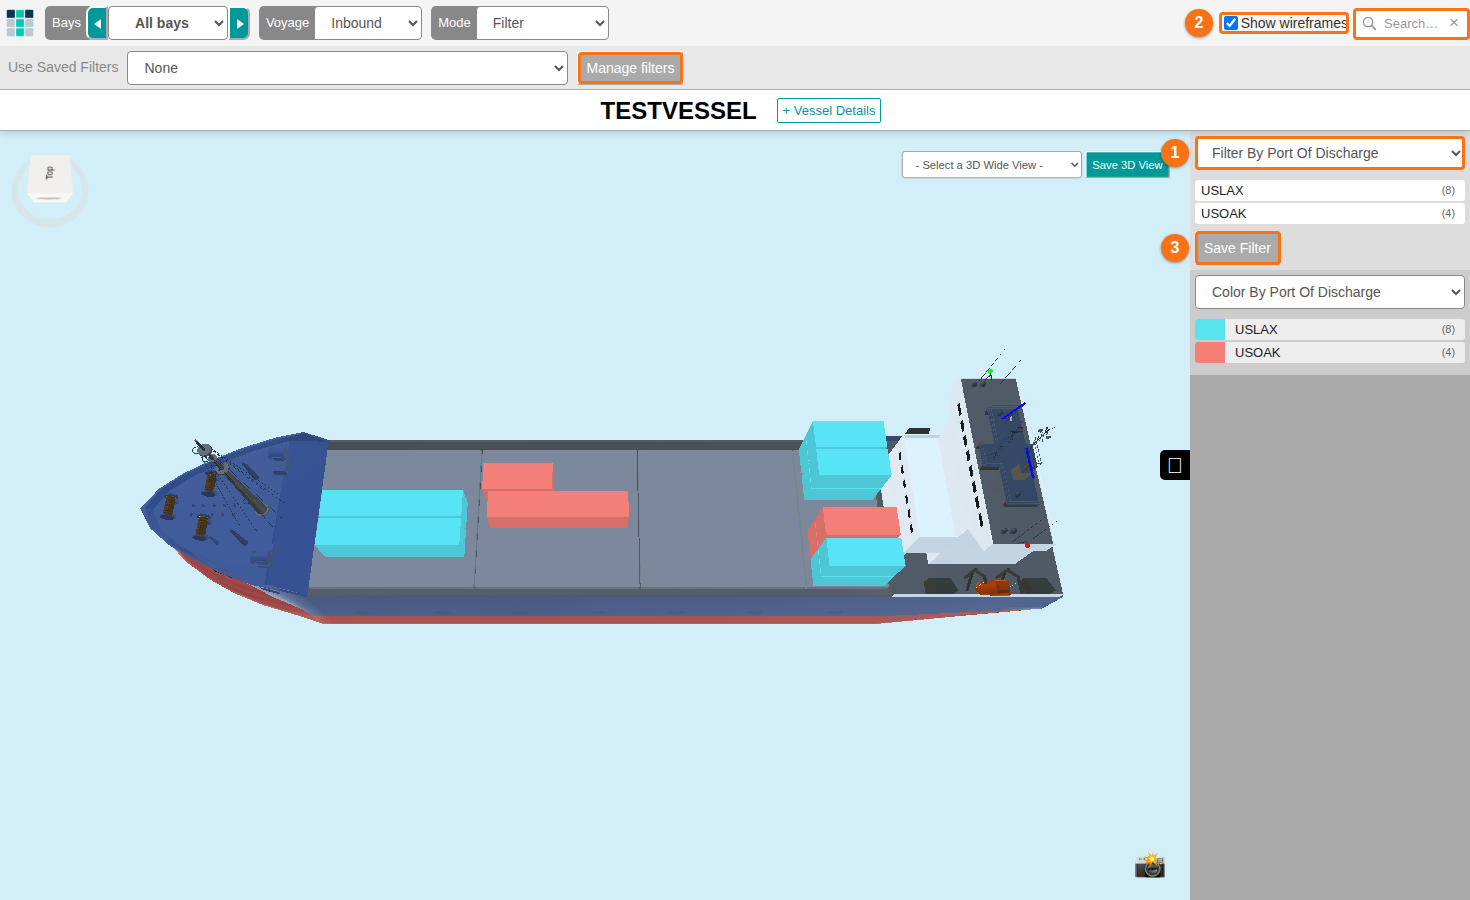
To filter the containers:
- In the filter panel on the right, choose an attribute in the first drop-down (1 in the picture), for example Port of Load or Hazardous.
- Click a value in the list below it. The 3D model updates by itself.
- Use Show wireframes (2 in the picture) to show or hide the white outline of the containers that are not selected.
- Click Save Filter (3 in the picture) to save the filter to your user profile. You can use it again with future BAPLIE files.
To use a saved filter: choose it in the Use Saved Filters drop-down under the menu bar. Click Manage filters to change the filter values or to delete the saved filter. Manage filters is enabled after you save a filter.
To find a container by its ID: paste the ID into the search box in the top right corner. Press Enter. The 3D model shows only the container with this ID.
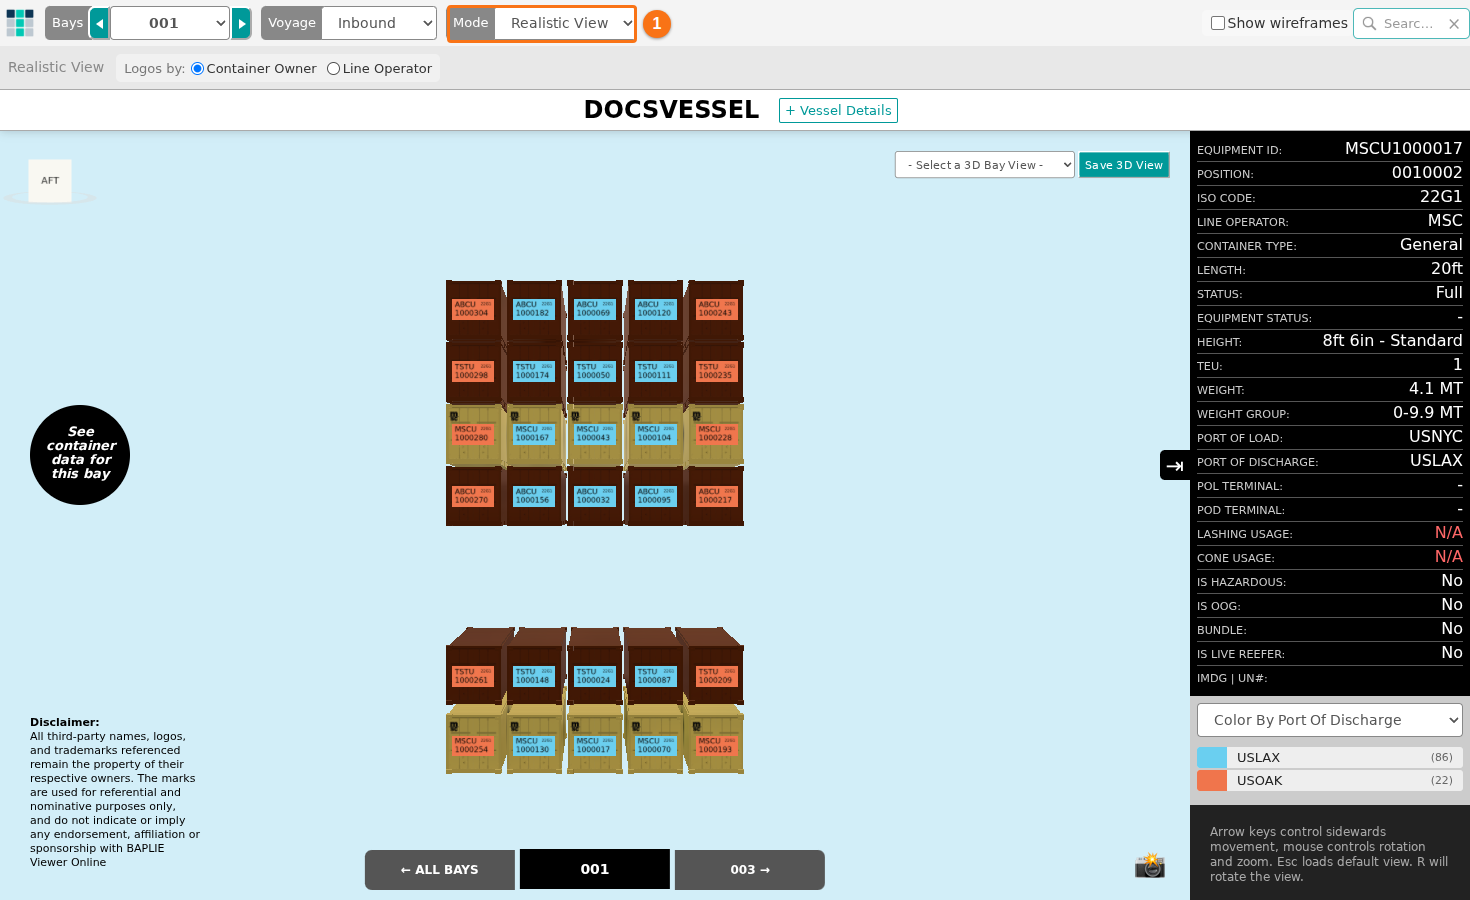
Change Mode to Realistic View to see a realistic version of the vessel. When the vessel reloads, it uses data from the BAPLIE file. The containers show accurate colors and the logos of their owners.
Choose a bay to see its containers close up. The details are on the forward (front) side of each container. Use Mode (1 in the picture) to switch to Realistic View. If your computer is too slow, the application shows a message. See How to display a realistic view of containers on a ship.