

How to download 2D changes as MOVINS and print the Operations List
Use this guide after you moved containers in the 2D Bay View. You can download the moves as a MOVINS file (a file of container moves), and you can print the Operations List, a PDF list of the same moves.
Before you start: make the moves in the Move mode. See How to use the Move Containers feature in 2D Bay View. Gold members cannot use Move. Changes in data as MOVINS is grey until the file has moves. Operations List PDF is grey when the file has no moves, and also when you do not have the permission for Move mode.
Download the changes as MOVINS
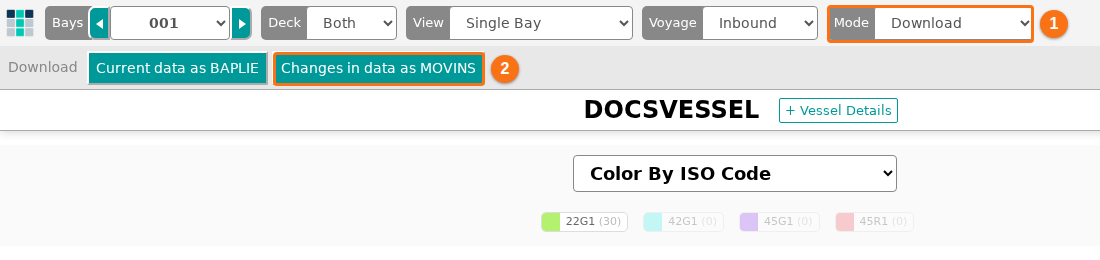
Section titled “Download the changes as MOVINS”- Open the 2D Bay View. In the Mode list at the top (1 in the picture), choose Download.
- Click Changes in data as MOVINS (2 in the picture). If the button is grey, the file has no moves yet.
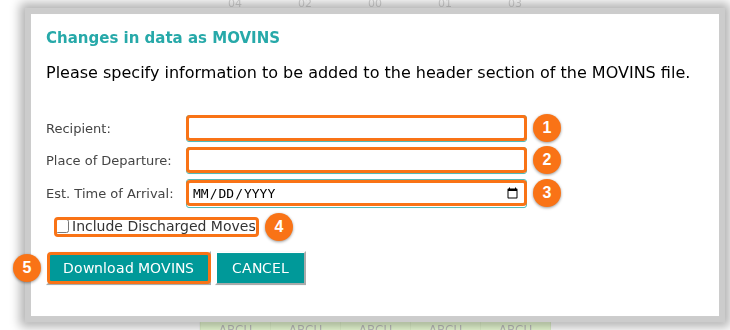
- The window Changes in data as MOVINS opens. It has the text Please specify information to be added to the header section of the MOVINS file. Fill in the fields:
- Recipient (1 in the picture) – the name or code of the receiver of the file. You can write up to 35 characters.
- Place of Departure (2 in the picture) – the port code. You can write up to 17 characters. The list suggests the ports of your file (the ports of discharge and the ports of load). The application changes the letters to capital letters.
- Est. Time of Arrival (3 in the picture) – the date of arrival. Use the calendar button, or type the date. Your browser shows the date in its own format.
- Include Discharged Moves (4 in the picture) – tick this box to include the discharged moves in the file. The box is off at the start.
- Click Download MOVINS (5 in the picture). To stop, click CANCEL.
- Your browser downloads the MOVINS file.
Print the Operations List
Section titled “Print the Operations List”- In the Mode list, choose View.
- In the View bar, click Print PDFs. Then click Operations List PDF. If the entry is grey, the file has no moves yet, or you do not have the permission for Move mode.
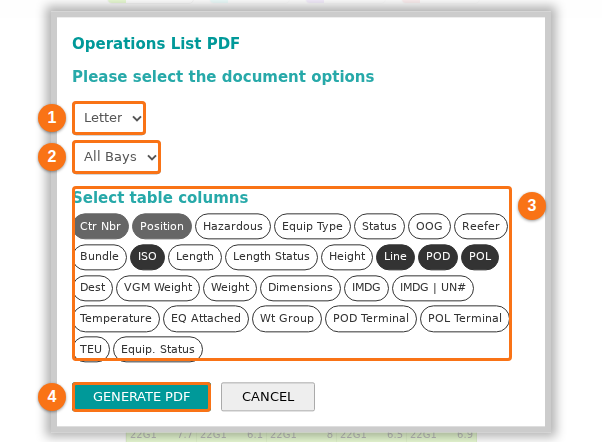
- The window Operations List PDF opens with the text Please select the document options. Choose the options:
- The paper size (1 in the picture): Letter, Legal, A4 or A3.
- The bays (2 in the picture): All Bays or one bay, for example Bay 001.
- Add Logo or Don’t add Logo. This list shows only if your facility has a logo.
- Select table columns (3 in the picture) – click a field name to add it to the table or to remove it. The dark buttons are on. You can choose up to 9 columns. The container ID (Ctr Nbr) and the position are always in the table. At the start, ISO, Line, POL, POD and Planned Position are also on.
- Click GENERATE PDF (4 in the picture). The window shows Generating pages, please wait….
- When the PDF is ready, click Download PDF. Click OK to close the window.
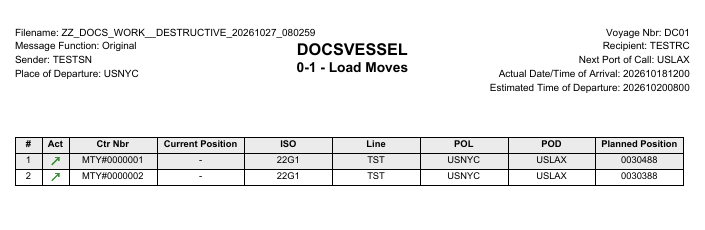
The PDF page is in portrait. It shows the vessel name and a title with the type of move, for example 0-1 - Load Moves. It has one row for each move. The columns in the picture are #, Act (an arrow shows the type of move), Ctr Nbr, Current Position, ISO, Line, POL, POD and Planned Position. The moves are in order by bay, by type of move and by position. The types of move are Load, Restow, Shift and Discharge.
If the selected bay has no moves, a message says No Operations have been performed for this bay. For the whole file, the message is No Operations have been performed for this file.
Good to know
Section titled “Good to know”- Current data as BAPLIE (in the Download mode) gives you the current data of the file as a BAPLIE file. The MOVINS file has only the moves.
- To make a MOVINS file from a BAPLIE file without using the 2D Bay View, see How to navigate the Create MOVINS option.
- If a button stays grey after you made moves, contact Support. See How to contact Support and create a support ticket.