

How to navigate the 2D Bay View
The 2D Bay View shows the vessel as a drawing, bay by bay. It shows where each container is stowed, above deck and below deck. It is made for stowage planners and vessel planners of shipping lines and container terminals. They use it to see the cargo plan (stowage plan) of the BAPLIE file. The view has many features that help with this work. This guide describes the screen, the views and the modes.
Before you start: upload a file to baplieviewer.com and open it.
Open the 2D Bay View
Section titled “Open the 2D Bay View”- In the Function Menu on the left, open Visualization and click 2D Bay View. The 2D data opens in a new window.
The 2D Bay View reads the BAPLIE file to find the maximum number of bays and the widest column. It uses this to draw the vessel. So the view scales for the smallest ship and for the largest ship.
2D and 3D are one app
Section titled “2D and 3D are one app”The 2D Bay View and the 3D Vessel View are now one page. You do not open a second window for 3D. You change the view with the view control in the top bar. The bay you chose, the color field and the filters stay when you change the view.
The view control has these choices: Single Bay, Mini Bays, Side, Deck and 3D.
To change the view:
- Check that Mode in the top bar is View.
- Click the view you want in the view control.
Good to know:
- Single Bay is the first view if you have not chosen another one. The application remembers the last view you used.
- 3D shows only if you can use Edit mode: you need Admin or Edit permission on a membership that includes Edit mode. Guest accounts and expired accounts do not see 3D. Without it, the view control has four choices.
- 3D works only in View mode. In every other mode, 3D is grey. If you choose another mode while you are in 3D, the page goes back to the 2D view you used before. If there was none, it opens Mini Bays.
- The menu entries 2D Bay View and 3D Vessel View in the Function Menu both open this page. 3D Vessel View opens the page in the 3D view. If you cannot see 3D, the page opens in your last 2D view.
For the 3D view, see How to navigate the 3D Vessel View.
The top bar
Section titled “The top bar”The top bar has two rows. The first row has, from left to right:
- Bays: the list of bays, with an arrow to the previous bay and an arrow to the next bay.
- Voyage: Inbound or Outbound.
- Mode: the list of modes.
- The view control: Single Bay, Mini Bays, Side, Deck and 3D.
- The box Search.
- The language list (see “Language”).
The second row is the mode bar. Its title is the name of the mode, for example View. It changes with the mode you choose. The status bar at the bottom of the screen shows a hint for the mode.
Select a bay
Section titled “Select a bay”Use the Bays list to choose a bay. You can also use the arrows next to it to go from bay to bay. A bay name such as 001 (002) shows the 20 ft bay first, and the 40 ft bay in brackets. In Side, Deck and 3D, the Bays list follows the bay that you click in the drawing. In these views, if you choose one bay of a 40 ft pair (for example 001 or 003), the application selects the pair. The Bays list does not work in Multi-Lift and Correct Restows modes.
Voyage
Section titled “Voyage”The Voyage list is set to Inbound at the start. See How to use the Inbound / Outbound voyage functionality.
Search
Section titled “Search”Type a container ID, or a part of it, in the box Search. Press Enter. Typing alone does nothing. In Edit and Move modes, the search adds the containers to your selection. For all the details, see How to find containers in 2D Bay View.
The views
Section titled “The views”Single Bay
Section titled “Single Bay”Single Bay shows one bay as a drawing. Each container in the drawing shows its most important attributes. The stack weights are shown at the bottom of the view. Below deck, the stack heights are also shown.
The bar View has these controls for Single Bay:
- A list without a name with the choices Both, Above and Below. Choose if the screen shows the containers above deck only, below deck only, or both. The screen updates by itself. The list starts at Both.
- The check box Fit to area. It is ticked at the start. The drawing then fills the free area of the screen.
- The check box Hazards View. See How to use Hazards View and print hazardous cargo in the 2D Bay View.
Mini Bays
Section titled “Mini Bays”Mini Bays shows all bays as small drawings, in rows. In each bay, the cargo above deck is over the cargo below deck. Use this view to plan many bays at once. You can also select containers with a rectangle in Edit, Move, Lashing Usage and Cones Usage modes.
Every container is a small box. The box has the color of the Colour by field. Small symbols show more information. The panel Color & Filter has a box LEGEND in this view only. It explains the symbols:
| Symbol | Meaning |
|---|---|
| Outlined diamond | Hazardous |
| Letter e | Empty |
| Letter r | Reefer |
| Small triangle | High-cube |
| Bar at the top left | 40-footer |
| Quarter circle | 45-footer |
| Break Bulk | Break bulk cargo |
| Oversize Top, Oversize Left, Oversize Right, Oversize Front, Oversize Back | Cargo that is out of gauge on that side |
If a slot holds more than one container, the slot shows one box with +N. N is the number of containers. If you color by Multi Lift Type, a small icon shows in the middle of each multi-lift group.
The bar View has these controls for Mini Bays:
- A list without a name that sets how many bays fit on the screen. Fit bays automatically is the default. - Fit 2 bays vertically - puts two bays above each other. Max N bays per row sets the number of bays in each row. The choices depend on the width of the screen.
- The check box Group bays vertically. It is not active when the vessel does not have a regular layout.
- The check box Hazards View.
Side and Deck
Section titled “Side and Deck”Side shows the vessel in profile. Deck shows the vessel from above. Both are made from the vessel definition. If the file has no vessel definition, the application makes one from the container positions. You cannot select containers in these views. For the steps, see How to use the Side view and How to use the Deck view.
3D shows a model of the vessel. See How to navigate the 3D Vessel View.
Colors and information panels
Section titled “Colors and information panels”The panels sit at the right edge of the screen. The panel Color & Filter has the list Colour by, the value list with a color for each value, the Sub-filter and Saved filters. The panel Information shows the details of the container under the mouse. For the steps, see How to use Color by, filters and the information panels.
Container details
Section titled “Container details”Click a container to see its details. A window opens next to it with a picture of a container and the important attributes of that container (2 in the picture). An attribute with no value shows a dash (-). To close the window, click the round button at the top (1 in the picture).
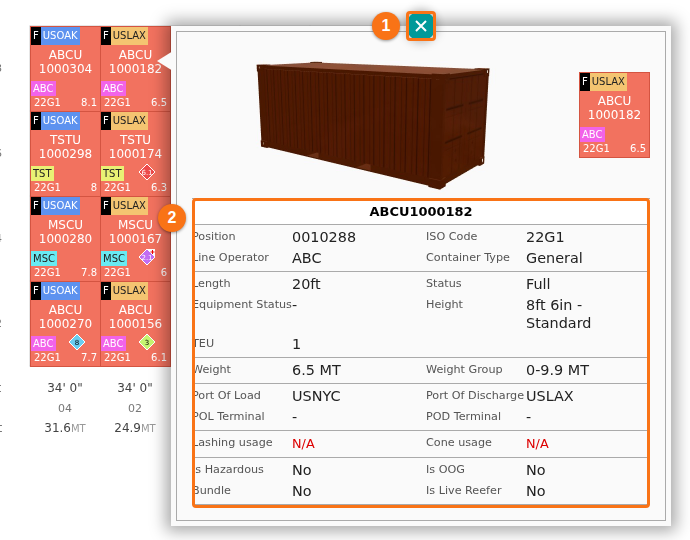
A right click always opens this window. A left click opens it in View, Download, Other Apps, Multi-Lift and Correct Restows modes, and in the Side and Deck views. In Edit, Move, Lashing Usage and Cones Usage modes, a left click selects the container in Single Bay and Mini Bays. Use a right click there to see the details.
The Mode list
Section titled “The Mode list”Use the Mode list to go to the main features of the 2D Bay View. The bar below the top bar changes with the mode you choose.
The Mode list has these entries: View, Edit, Move, Download, Other Apps, Multi-Lift, Lashing Usage, Cones Usage and Correct Restows. Lashing Usage and Cones Usage show only when they are enabled for your site and your membership allows them. If a mode is not allowed for you, a window tells you that the function is not available.
If you are in the middle of a Re-Stow, Load New or Load Generic Empties action in Move mode, you cannot change the mode. A window says “Please finish or cancel the current process before changing Mode.”
The bar View has these controls, from left to right:
- Print PDFs: a list with Bay View PDF, Mini View PDF and Operations List PDF.
- Customize: a list with Customize Colors, Customize Container and Customize Header.
- Dimensions: a list with Change Vessel Dimensions & OVDs and Create/Update Vessel Definition from BAPLIE data.
- The controls of the view that you use (see “The views”).
- The time of the last update of the file.
The old modes Settings and Dimensions do not exist any more. Their functions are now in the lists Customize and Dimensions.
The page also has the buttons Stowage Errors and Invalid Positions near the vessel name. They show only when the file has stowage errors or invalid positions. Stowage Errors colors the containers by Stowage Errors. Invalid Positions opens Move mode for users who can use it.
Print PDFs
Section titled “Print PDFs”Choose this entry to choose the document options and make a PDF of the Letter Plan. You can print one selected bay or all bays.
Choose this entry to choose the document options and make a PDF of the Scan Plan. You can choose how many bays are printed on each page.
Choose this entry to get the operations list as a PDF. It is not active if you cannot use Move mode.
Customize Colors
Section titled “Customize Colors”Change the colors in the 2D view to fit your business. The window has the same attributes as the list Colour by. Your colors are saved to your user profile. They are used for all files you upload later.
Customize Container
Section titled “Customize Container”Choose this entry to choose which information each container box shows in Single Bay. The window title is Customize Single Bay Info Displayed. Your choices are saved. These are the options and their defaults:
| Row | Choices | Default |
|---|---|---|
| Container ID | Show ID, Show Position (the 7-digit position) or Hide ID | Show ID |
| Top Left Text | Show Port of Discharge, Show Port of Load or Show Destination, with a color tick box | Show Port of Load |
| Bottom Left Text | Show Carrier, Show Port of Discharge, Show Port of Load, Show Destination, IMDG | UN or None, with a color tick box | None |
| Status | Show Status or Hide Status, with a color tick box | Show Status |
| ISO Code | Show ISO Code or Hide ISO Code, with a color tick box | Show ISO Code |
| Weight | Composite Weight, VGM Weight or Weight, with a color tick box | Composite Weight |
| Height | True Height or Same Height | True Height |
| Type | Show Icon, Show Label or Don’t show | Show Icon |
| OOG symbols | Show OOG or Hide OOG | Show OOG |
| OOG Dimensions | Show OOG Dimensions or Hide OOG Dimensions | Show OOG Dimensions |
| High-Cube | Show Icon or Hide Icon | Show Icon |
| Round Weight | Do Not Round Weight or Round Weight | Round Weight |
| Weight in stack | Use 50% of 40 ft weights or Use full weight | Use 50% of 40 ft weights |
VGM means verified gross mass. Composite Weight is the VGM weight if there is one. If not, it is the weight without VGM. A color tick box colors that text with the color of the container. In Hazards View, Bottom Left Text shows IMDG | UN. True Height does not apply in Edit and Move modes, where all boxes have the same height.
Customize Header
Section titled “Customize Header”Choose this entry to change the vessel header information. The window title is Select Header Fields & Position. For each field, choose Don’t show, Left side or Right side. The header is also used in the PDF files.
Dimensions
Section titled “Dimensions”See How to change the vessel dimensions.
Use this mode to edit the container data of your file. The bar Edit Containers has these buttons: + Add from list, → Edit selected, → Remove properties from selected and × Clear selected. A number shows how many containers are selected.
- Select one or more containers in Single Bay or Mini Bays. → Edit selected is active only when at least one container is selected.
- Click → Edit selected.
- To remove the selection, click × Clear selected. No container is selected then.

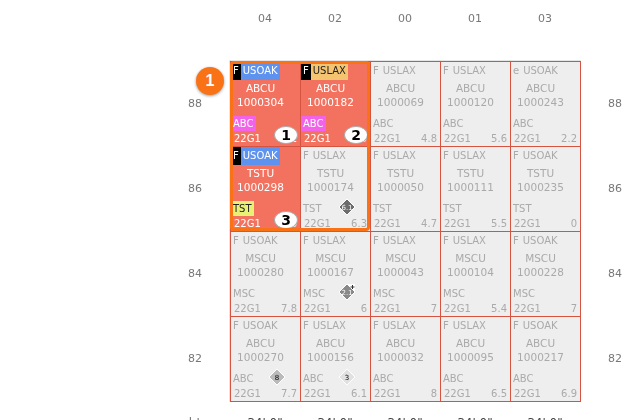
When containers are selected, the number next to the buttons shows how many (1 in the first picture below). The selected containers keep their colour and get a number in the bay (1 in the second picture). All other containers turn grey.

Choose this mode to turn on the Move Containers feature. You can then Load New Containers, Load Generic Empties, Unload Containers and Re-Stow Containers. The bar Container Actions also has Shift-On-Board, Correct Position and Print Bay Plan. The panel Containers to move opens at the right edge of the screen.

Download
Section titled “Download”Use this mode to download your data. The bar Download has two buttons: Current data as BAPLIE and Changes in data as MOVINS.
- Click Current data as BAPLIE to download the current data as a new BAPLIE file.
- Click Changes in data as MOVINS to download the changes in your data as a MOVINS file.

Other Apps
Section titled “Other Apps”The bar Other Apps has the button Launch Damaged Containers App. See How to use the Damaged Containers add-on.
Multi-Lift, Lashing Usage, Cones Usage and Correct Restows
Section titled “Multi-Lift, Lashing Usage, Cones Usage and Correct Restows”- Multi-Lift: see How to use the Multi-Lift opportunities report.
- Lashing Usage and Cones Usage: see How to track cones and lashing in the 2D Bay View.
- Correct Restows has the buttons Process Restows and → Execute Restows.
In Multi-Lift and Correct Restows modes, the panel Color & Filter and the Bays list are not active.
Note: each mode needs a permission or a membership. Edit, Multi-Lift and 3D need a membership that includes them. Move needs the Vessel Operations add-on and Admin or Edit permission. Other Apps needs the Damaged Containers add-on. For more information, see the Membership FAQ.
What the viewer remembers
Section titled “What the viewer remembers”The viewer saves these choices to your profile: the last view, the Colour by field and the Sub-filter field, Group bays vertically, your Customize Container choices, Starboard or Port, Tiers shading and its color, and if the panels are open or closed. The fit list of Mini Bays, Fit to area and the Both, Above and Below list start again with their default values each time you open the page. The values that you click in the panel Color & Filter are not saved.
Language
Section titled “Language”The language list at the right of the box Search has EN and ES. When you choose a language, the page reloads in that language. The file, the bay and your settings stay. If BAPLIE Viewer Online tells the viewer your language when it opens, the list is not shown. You cannot change the language while a Move action is open.