

How do I change the colors of the containers?
There are two ways. Use the list Colour by to choose which field sets the colors. Use Customize Colors to change the color of a single value, for example one ISO code. Both work in the 2D and 3D views.
Before you start: open your file in the 2D Bay View.
Choose the field to color by
Section titled “Choose the field to color by”- In the Function Menu on the left, open Visualization and click 2D Bay View.
- Open the panel Color & Filter on the right.
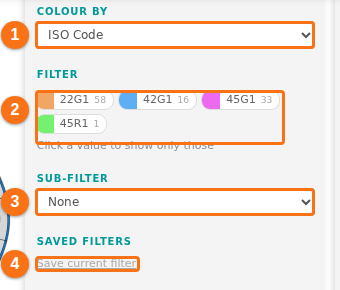
- In the list Colour by (1 in the picture), choose a field. The containers change color.
- Look at the values under the list (2 in the picture). Each value has a color box and the number of containers. Click a value to show only the containers with that value.
Change the color of a value
Section titled “Change the color of a value”- Check that Mode in the top bar is View.
- In the bar View, open the list Customize and click Customize Colors. The window Customize colors opens.
- Open the list in the window and choose the field. It has the same fields as Colour by.
- Click a value. Change its color with the sliders or the box with the color code.
The change is saved at once, in your user profile. To go back to the default color, click RESET.
Good to know
Section titled “Good to know”- The first choice in Colour by is - No Color -. ISO Code is used until you choose another field.
- In the Deck view with Tiers shading ticked, the colors show the number of tiers and not the Colour by field.
- In 3D, the skin Colored uses these colors.
- To set colors for weight groups, see How to set custom weight groupings for colors in 2D and 3D view.
For all the steps, see How to use Color by, filters and the information panels and How to customize colors used for containers in 2D Bay View.